We wish you all a very Happy Onam !
Making pazham ada from scratch
Five days from today, people in a green strip of land in southern India will sit down for a splendiferous vegetarian feast called “sadya”, served with great reverence on a banana leaf, fresh flower carpets called “pookalam” adorning their front yards, vivid memories of the season from years gone by floating in their heads. The rest of us from that place scattered around the globe, will scramble about to see if we can make at least one curry from the sadya fare, luckiest will find an Indian store nearby to gather everything they need to make the sadya, many will still prepare one no matter what, some will actually find fresh banana leaves, but all will be thinking of Onams gone by!! Regardless of where you are, if you have experienced an Onam before, you will surely be thinking about it, it is that kind of a season!
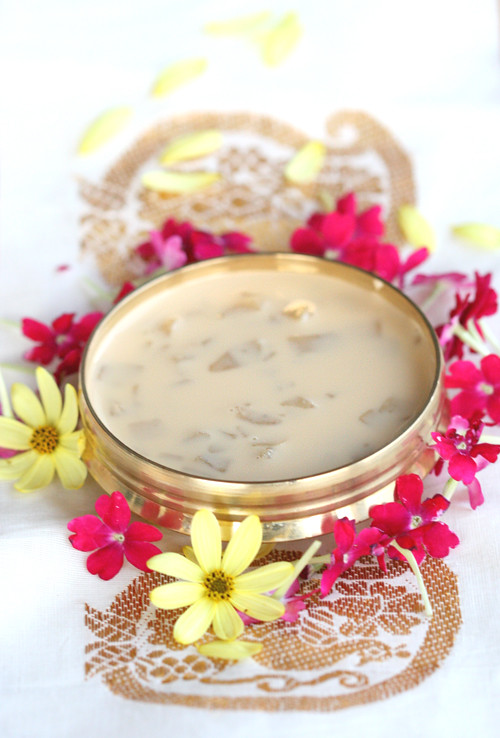
From here, I could go on a nostalgic rant (plenty of whiffs and sobs included) and make you flee from this blog instantly; instead I chose to make some ada from scratch for making a payasam for this year’s Onam and post a pictorial of sorts. . For beginners, ada in this context is a crushed up eggless flat rice noodle used for making payasam, the king of all desserts from my place. This is a melt in the mouth – oh-so –really –good – ada almost exclusively made of mashed ripe plantains, with just enough rice flour to hold everything together. The result is absolute plantain flavor explosion in every bite! Once you prepare the ada, you have two delectable options ahead of you, make ada pradhaman (payasam with jaggery) or prepare a pal payasam (with white sugar). I am making pradhaman for Onam, for the trial run I made some pal payasam.
If you are to make this the way it is traditionally made, you will dip your hands in batter, and with fingers pointing down, gently wave over a banana leaf which in turn will be rolled up and steamed. The batter in the traditional recipe is thinner than the one I used here, and could contain more rice flour than this recipe as well. I purposely decided to digress because
1) we are using parchment paper instead of banana leaf, less water in the batter is better.
2) I wanted this ada to be extra smooth and bursting with plantain flavor.
If you are planning to make this paysam, you still have enough time to do so. Making this will only take some 60 minutes out of your life. This freezes incredibly well, I have a batch in my freezer waiting for Onam as we speak.
Here you go, 1-2-3 !

Making Pazham – Ada
Plantains (ripe, with plenty of black spots on the skin) or very ripe bananas – 5 nos
Unroasted rice flour – 3/4 cup
Ghee or clarified butter– 1 tsp
Peel plantains and puree till very soft in a blender, add ghee followed by rice flour 2 tbsp at a time, blending in between. Add some water to loosen the batter if it gets too thick. The batter should fall from the spoon in thick sheets when lifted.
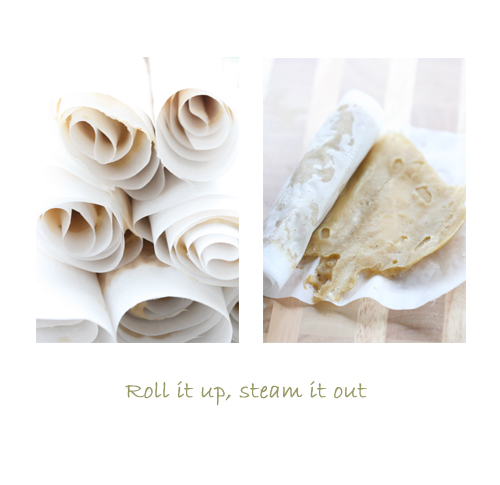
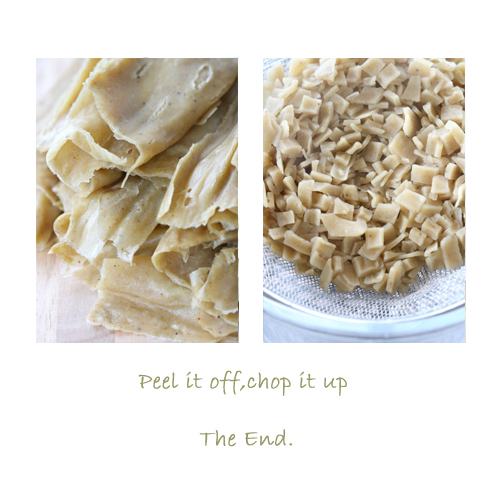
Cut 30 cm x10 cm parchment paper pieces. Spread 4 tbsp of the batter on the paper, making it as thin as possible. An offset spatula is very helpful in doing this. Roll the paper tightly starting from the short side; keep the roll seam side down in a steamer. Repeat the same with the rest of the batter. Steam the rolls for 30 minutes. Let the rolls cool down for 20 minutes, peel the paper backing off. Chop the cooked ada sheets into thin pieces. Use fresh for making pradhamans or freeze up to a month. Before using in the paysam, crush some ada with your hands, so that some will break down into irregular pieces, which to me improves the ruggedly look of the payasam.
Pal Payasam
Ada – 3 cups
Milk – 10 cups
Sugar – 21/2 cups
Crushed cardamom – 4 pods
Long method
In a thick bottomed pan, melt sugar with ½ cup of water. When the syrup forms, add ada, cook with stirring for about 10 minutes. When the mixture thickens, add a cup of milk to loosen it. Add the rest of the milk, turn the heat to medium, and cook with occasional stirring till the milk reduces to about ¾ th of its initial volume. At this point turn off the heat, add crushed cardamoms and keep it covered. The payasam will thicken as it cools.
Quick method
Add all the ingredients to a pressure cooker. Keep on the stove in high heat till you see steam coming out of the vent. At this point keep the valve weight and turn the heat to very low/simmering mode. Cook for 40 minutes this way, occasionally lowering the heat if the cooker readies to blow a whistle. Open the cooker 20 minutes after turning the heat off. This is pretty much a hands off method, and the end result is just as good.
Ada Pradhaman
Ada – 3 cups
Brown sugar – 2 cups
Molasses – 1 cup
Ghee – 1 tbsp
Coconut milk – 2 cans (13 oz each)
Dried ginger powder – ½ tsp
Coconut slivers fried in ghee – ½ cup Optional
Mix molasses, brown sugar and ¼ cup water in a thick bottomed pan. Heat till the sugar melts, add ghee, ada and cook with constant stirring for 5-10 minutes. Mix 1 can of coconut milk with 3 volumes of water and add to the mix. Cook with stirring till the ada pieces are tender (~20) minutes. Add the remaining can of coconut milk, cook for 2 more minutes with constant stirring, and turn off the heat. Add powdered dried ginger and fried coconut pieces. Let it stand for 20 minutes for the flavors to blend.
• Substitute molasses and brown sugar with three cups of grated jaggery
• If using fresh coconut milk, use 6 cups of thin milk for the first step and 3 cups of thick milk for the second.