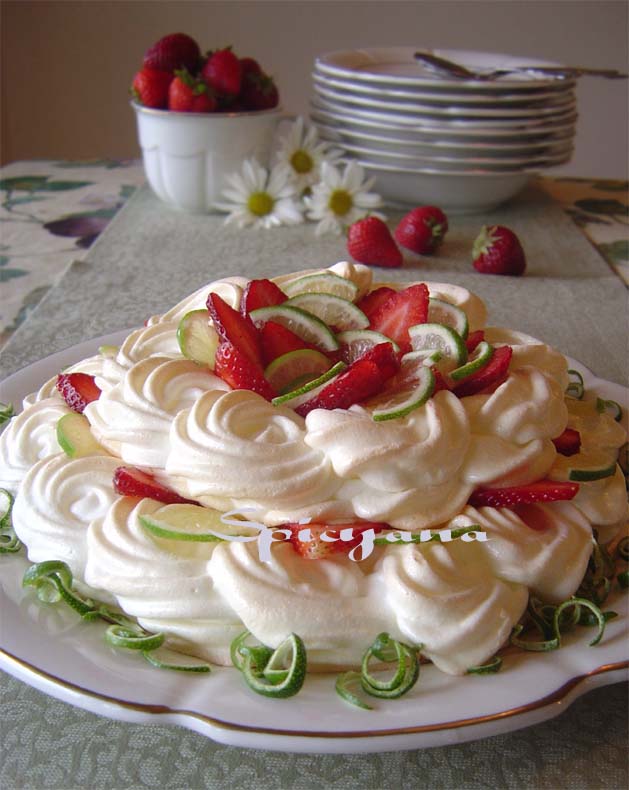
Strawberry Lime Pavlova - JFI Strawberries

Doubtless God could have made a better berry (than the strawberry), but doubtless God never did.
-- William Allen Butler


Ingredients

6 egg whites
1/4 tsp. cream of tartar
2/3 cup sugar
1 ½ cup whipping cream
3 cups fresh strawberries, hulled and sliced
1 lime
Icing sugar to dust

Method
Preheat the oven to, 275°F. Line 2 baking sheets with baking parchment. Make the meringue by whisking the egg whites with cream of tartar in a very clean dry bowl with an electric whisk for 4-5 minutes until thick. Whisk in the caster sugar a tablespoon at a time, allowing 20 seconds in between each one, until all the sugar is combined. Place the meringue in a large piping bag with a star nozzle. Pipe a disc, 12in (30cm) in diameter, onto the baking parchment of one baking sheet and pipe another disc, 8in (20cm) in diameter, onto the other. Place in the oven for approximately 2 hours or until the meringue has dried out and starts to color. Remove from oven and allow to cool. Peel away the baking parchment and place the large meringue on a serving dish, spread whipped cream and cover with sliced strawberries. Place the smaller meringue on top and decorate with the remaining strawberries. Grate the zest of the lime with a fine grater all over the top of the meringue and dust with icing sugar, decorate with lime wedges.
Here is more about the dessert and the ballerina
Chinese Banana Toffee


Chinese banana toffee is a very unique confection comprising of multiple surprising texture elements. Basically it is made as a fritter, but the process does not seem to stop there. Applying the right combination of perfect timing, and correct temperature, fried bananas are dipped in hot caramel, plunged into ice-cold water, and retrieved with out much waiting. Result is a very good looking three layer candy with a crunchy caramel coat, with fried batter skin underneath enwrapping tender pieces of sweet ripe banana. Caramel is a fun medium to play with and extreme caution will be a nice attitude to put on while we are working on it. Within the limited amount of time, when it is hot and malleable you can use it to create all different kinds of interesting structures. I decided to give this recipe a try after reading talented Gattina’s post on Caramel deep fried bananas.


Bananas ( Ripe and firm) 4
All purpose flour ¾ cup
Cornstarch ½ cup
Baking powder 1 tsp
Water ¾ cup
Sesame oil 1 tsp
Oil For deep frying

For Caramel

Sugar 1 cup
Sesame seeds (Optional) 2 tbsp
Water 4 tbsp

Ice cold water ( for quickly chilling the toffees.)

Cut bananas diagonally into thick slices. Sift the flours and baking powder together; prepare batter by adding water and sesame oil. Stir in the bananas and gently mix until coated. Heat oil in a pan; deep fry the pieces, taking care to add it one by one. Fry till golden brown, drain on paper towels. When all pieces are fried, make caramel. Mix sugar, water and sesame seeds in a pan. Heat gently, stirring occasionally till all the sugar has dissolved. Increase the heat and continue cooking without stirring, till the syrup becomes a light caramel (Heat for some more time if you desire a darker caramel, taking care not to char the sugar). Remove from the heat, and work very quickly through the rest of the steps. Drop one fritter at a time to the hot caramel, turn it over with a fork, remove immediately and plunge into the iced water, take it out, and drain on a wire rack while proceeding with the rest.

Recipe adapted from Ann Kay’s Desserts-500 Delicious Recipes.
The Patchwork Cake


Two weeks ago T and I, celebrated our wedding anniversary. In the past, when we were about to celebrate our first year together, it suddenly dawned on me that we should definitely start a tradition for our little family. So I bought a heart shaped pan, baked a cake, tried to decorate it with chocolate icing. Even though I was baking breads and cakes that time, was not really venturing into cake decoration. All I owned back then was a Wilton dessert decorator, which comes with a limited number of icing nozzles. . I tried to cover up the imperfections on the cake I baked, managed to make a shell border (which now looks awful) and added a tiny little golden ribbon bow. Exactly after two years, after apparently spending time to perfect my piping skills, and molding techniques, and collecting countless tools of the trade, all I did this time, on this year’s heart cake, was covering up the defects. We had a guest for couple of days, were both overjoyed to have him with us, and practically forgot about baking a cake. By the time we saw him off, we were just only one night away from the DAY! So I started galloping around the kitchen, baked a cake according to the recipe card which popped up first, grew impatient and tried to take it out even before it cooled. Well, at the end, I was left with a severely disfigured heart and piles of cake crumbs. There was hardly enough time to bake again, so I sat with some apricot jam, and tried to paste the pieces together, even had to make a “crumb mortar” to fill in the gaping holes. I should have known that patience pays!!!!

Butter cream is only sparingly used for this cake, mainly as glue for sticking whatever you see on the top. The rounds stand up flowers, and the beads are all made of marshmallow fondant. My initial plan was to cover this cake with a sheet of fondant, but then as the surface was almost beyond repair, I finally shifted on to a more dimensional plan, using fondant cutouts, which to a certain extent concealed the flaws on the surface. Wiggly piped icing, flowers and beads are all used as visual diversions. When I actually started off on the cake, I was never even sure that this will ever turn out into something “photo worthy”. You now know why this post does not carry step by step photos. Altogether when I think about the series of events which culminated with this cake, I am somehow feeling very content. As time goes by, you do not always learn to excel, but you do learn to rectify your mistakes gracefully. I am getting a line and growing up…

Ciao!

Please follow the link to learn how to make marshmellow fondant

Slider

Related Posts Plugin for WordPress, Blogger...